

Pinball Knights

For the past 6 months, I collaborated with others to work on a pinball game called, “Pinball Knights”. It is a pinball game with rpg elements for mobile games. It is currently in an early stage.
Things I assisted with:
Models:
Bird 1

Bird 2

Rocks

Breakdown:
Here is a more detailed look at each model. Please note that some models may not be complete (click each image of enlargement).


Special note on the rocks: I chose one set because the rocks are mostly the same.

Process:
I used the program, 3DS max, to make these models.
I use objects, such as boxes, spheres and more, to create the models.

I then edited them into the shapes I wanted with editable poly.

And finally, I unwrap them so I can make textures for later.

What is my next step:
Because of communication issues and not enough time to refine a lot of models, my team and I were unable to make a playable demo. So my next step with my team is to develop “Pinball Knights” over the next year.
For this project, I took the Unity game kit, “Flying Bird” and replaced the art assets with my own original art.
Original Game:

My Rendition:

(click on this image to play the game)
Process:
I first take an asset from the unity game.
Then create my own object in 3ds max and photoshop. 
For objects like leaves, I used a plane and changed the alpha channel from the opacity map in 3DS max. 
When rendered and put through 3DS Max and Unity, the leaves will have a transparent background.

The final result would look something like this:

Comparisons:
Original:


My interpretation:


Original:


My interpretation:


Original:


My interpretation:


Original:


My Interpretation:


Original:


My interpretation:


Assets used:


![]()


What I Learned:
During the process, I encountered some issues which included making my own rendition of the assets from the “Flying Bird Game”.
I solved this by looking up references.

And then using 3DS Max for the bird model and Photoshop for the feather texture (A special trick with the bird model is that it is a 3D object with a front perspective in 3DS Max).


I also learned how to replace the original assets with my own.
For example:
I take this frame.
In order to replace the original.
I simply rename my art with with the name of the original art.

Then I replace the art in the unity file with my renamed art.


Which will have the following results.

Intro: For this part of my “work in progress,” I am creating models that relate to “product visualization.”
Highlights:
Baseball Helmet: For this model, I did the following methods in 3DS max and Sketchfab:
–
I made the model in 3DS Max w/edible poly.

Then I used the “Symmetry” tool to make the helmet whole and the “turbosmooth” to make it smooth.
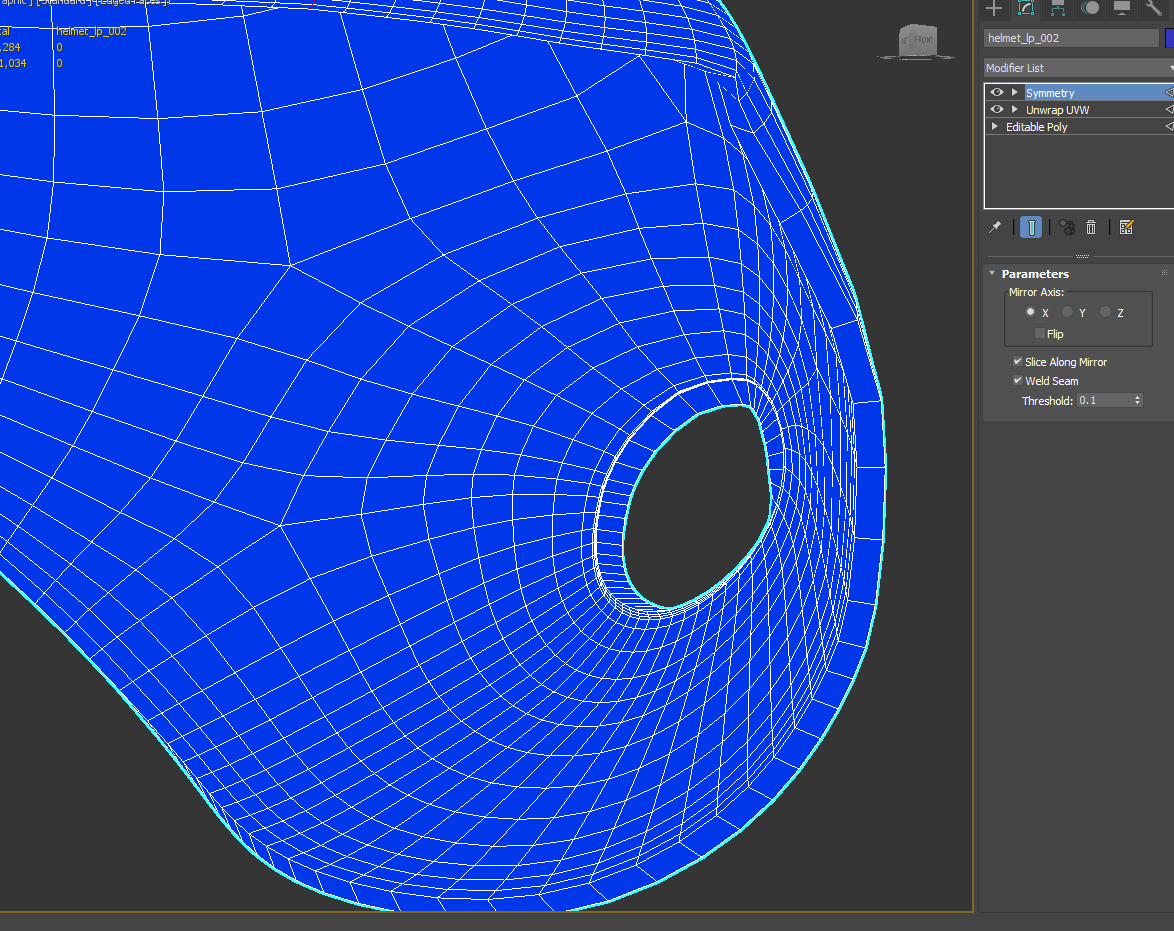
I used the “Shell” Modifier to create the rims for the helmet.
Golf Club:

For the golf club, I began by using a “cylinder.”

Then, through editable poly, I used the polygon and edge tools to create a handle shape. After that, I used the “turbo smooth” to make the handle look smoother.

I also used the “Polygon Smoother Group” to correct any rough polygons.

The putt of the golf club was very difficult. I used the “extrude” to make the putt, and then used the polygon tool to make the face flat.

I used “mesh smooth” tool to make the putt smooth, but only on that area.
After I unwrapped the model in 3DS max for textures, I made the textures in Photoshop:

It doesn’t look so impressive now. However, this changes when I send it to the site, “SketchFab.”

After exporting my 3D model from 3DSMax as an “FBX” I put it into Sketchfab and went into the 3D modeling settings. I also used various settings to change my model’s appearance.

I then used the “manage textures” settings in “Base Color” with the golf texture.

I also did he same for the “metalness” settings.

I then used the “roughness” settings to make some roughness to my model.

I put my golf textures in various settings that include “Normal/bump, Substance Scattering, Ambient Occlusion. and Cavity.” This produced the final results:


And here is my completed model from 3DS Max to SketchFab.
Hat:
For this model, I wanted to demonstrate “fixing and expanding” a model.

Here is what my model was originally. It looks rough and it was made with two objects. Plus, there were signs that it wasn’t exactly what I originally intended it to be. I decided to fix it up a bit more through 3DS Max.

I first deleted the flap object and “Extrude” the lower front polygons on the cap itself multiple times, I then smoothed it out with the “relax” options in polygon mode. Now, it is one object.

Next, I used a method called “Probolean” where I take an object and manipulate it with another object to create a hole shown in the image above.


The final steps include using the “symmetry tool” to make it a whole object, and the “Shell tool” to create the thickness of the rims. Now it is ready to be viewed in sketchfab here: https://sketchfab.com/models/0dc9e489df1a4245844483bfa4462f84
Bottle by timothylai93 on Sketchfab
“>
Reference:

UVs:

*Click Image to go to SketchFab Object or Click “Baseball hat” Above image to go to SketchFab Page

Reference Image:


UVs:

*Click Image to go to SketchFab Object or Click “Baseball Bat” Above image to go to SketchFab Page

Reference:

UVs:


Reference:

Uvs:

*Click on image to see BaseBall model or Click on “BaseBall” link to go to sketch fab*

Base Ball
by timothylai93
on Sketchfab
Reference:

![]()
UVs:
*UVW Map was used in 3DS Max so UV is unavailable
Puck:
*Click on image to see Puck model or Click on “Puck” link to go to sketch fab*

Puck
by timothylai93
on Sketchfab
Reference:

UVs:

*Click on image to see Helmet model or Click on “Helmet” link to go to sketch fab*

What I learned in Gaming Class
From February to May of the Spring Semester, I learned different types of modeling and texture methods, like building and assembling “Modular Sets”. I also gained more experience for “Unwrapping”. I have worked on two projects for this semester.
Game Project: Athlete Anarchy
Team Role: Modeler
First task: Building modular sets for residential homes.

Reference

Modset

Wireframe

Combined sets
What I learned: I learned that making buildings can take a lot of time and many game developers create several modular sets and combine them to create different shapes and buildings to save time. I learned many things doing this method, which includes:
-Created walls with planes
-Created window frames with extrude modifier
-Combining walls to form a building
Greatest Strengths: I feel that my greatest strengths include:
-Simplicity in creating multiple sets
-3d modeling
What next: I plan to do the following:
-Have a better time window so I could make sets faster
-Notice issue in the models (example: see through as a plane)
-I wish to develop these sets more in terms of texture and put it into unity as I feel that the set is incomplete.
Breakdown of: Modular sets

Step 1- I created a plane with however many vertices and edges so that I can form the shape of a wall. If it is a wall, then I would just expand the wall and unwrap (more on this on later steps).


Step 2- I converted the plane into an “Editable Poly” and used the Vetices and Edges selection to created shapes for stuff like windows and shapes. I used the “Swift Loop Tool” to create more edges so I can create windows. Finally, I then used an “Extrude” edit tool to create window edges for the plane.

Step 3- I then unwrapped the wall so I can put textures on it.


Step 4- I then create the textures in Photoshop and made the final wall (shown above).
I continued this step for about 30 different walls of different shapes and sizes with different textures.
Second Task: Create Robot Referee

Reference

Final

WireFrame
What I learned: I didn’t learn so much as gained more experience for myself in 3D modeling. I gained more experience by:
-Using normal and bump maps
-Making joints for animation
-Using low poly and high poly to create defined edges
Greatest Strengths:
-3D Modeling
What Next:
-Gain more knowledge to animate in 3DS max and unity
Breakdown:

Step 1- I created simple boxes and spheres with low poly to create the refereebot out of simple shapes.

Step 2- I then created the hands with extrude, bevel, and inset. It was a long process and I regret that I can’t recreate it through photos.

Step 3- I then created objects with holes to reduce the polycount and form the legs and pelvis.

Step 4- I unwrapped the model (it is messy because all of them were separate objects combined)

Step 5- I combined all objects into one and created a duplicate with the chamfer tool. After that, I put the hi poly on top of the original model and used the render to texture method to create normal maps.

Step 6- I created the texture through photoshop.

Step 7- Once I finished the textures, I put the textures on the appropriate channels and applied it to the model.

Step 8- The final result is a model with light bouncing off of it.

Status: “In-development” Process: For the creation of the vase, please look at the steps below.
Things I still need to do in order to have it be complete: Pending use in game.
Question for reviewer: How can I improve?
Artist: Timothy Lai
Media: Modeling (3DS Max)
Use: Currently unused for game
*To exit enlarged image mode, press the back button in your web browser.
Vase Steps:

In the image above, I created the vase asset by doing the following steps:
Step 1: Use the Line tool (found in the modify list)
Step 2: Move the vertices around and then use the bezier (the blue highlighted option in the drop down menu from the image above)
Step 3: Use the Lathe (found in the modify list) tool to create the vase in the image above.
Step 4: Using the Xform modifier (in the modify list) to scale them.

Status: “In-development”
Process: For steps in the creation of Platform Assests 1-3, please check the steps below.
Questions for reviewer: How can I improve the platform?
Artist: Timothy Lai
Media: 3D Modeling (3DS Max)
Use: Used as platforms for “Earthina into the Jungle” game.
*To exit enlarged image mode, press the back button in your web browser.
Land:
Step 1

Step 1: I created a box for the “grass” and “land”
Step 2: I used the MeshSmooth to smoothen the edges
Step 3: I used the edit poly to make more natural curves
Step 2

In this step, I used the vertex tool (highlighted in yellow) to move the point forward in order to make bumps (as shown better in the platform above.
Step 3

In this step, I used the edge tool (highlighted in yellow) to move the line (highlighted in red) to either raise, move the line sideways, and create more lines by cloning it.
This marks the end of the land platform (the picture shown above) steps.
Grass:

This step was done in the same manner as the “Land” platform. However, there are some differences.
Step 1: The noise modifier was used to make the “grass platform” have more wild edges.
Step 2: Unlike the previous steps, the “grass platform” was created by cutting the top portion of the platform next to it. In order to have it render properly, I used the shell modifier. That way, it wouldn’t be see through.
This marks the end of the steps for the creation the the platform assets.
UVs:
Land

This wireframe was created in 3DS max using the Unwrap UVW. This was done to later (if possible) add any additional details for any platforms shown in the “Earthina into the Jungle” asset section.
Grass

This wireframe was created in 3DS max using the Unwrap UVW. This was done to later (if possible) add any additional details for any platforms shown in the “Earthina into the Jungle” asset section. There are some errors, like the wires touching each other.
Errors:

This is unfortunately what happens when I cloned the platforms and stretch then to a different size. Errors include:
-Stretched squares
-Distorted squares
-Uneven squares
I hope to fix this in the future.

Status: “In-development”
Process: For steps in the creation of Platform Assests 1-3, please check the steps below.
Questions for reviewer: How can I improve the platform?
Artist: Timothy Lai
Media: 3D Modeling (3DS Max)
Use: Used as platforms for “Earthina into the Jungle” game.
*To exit enlarged image mode, press the back button in your web browser.
Land:
Step 1
Step 1: I created a box for the “grass” and “land”
Step 2: I used the MeshSmooth to smoothen the edges
Step 3: I used the edit poly to make more natural curves
Step 2
In this step, I used the vertex tool (highlighted in yellow) to move the point forward in order to make bumps (as shown better in the platform above.
Step 3
In this step, I used the edge tool (highlighted in yellow) to move the line (highlighted in red) to either raise, move the line sideways, and create more lines by cloning it.
This marks the end of the land platform (the picture shown above) steps.
Grass:
This step was done in the same manner as the “Land” platform. However, there are some differences.
Step 1: The noise modifier was used to make the “grass platform” have more wild edges.
Step 2: Unlike the previous steps, the “grass platform” was created by cutting the top portion of the platform next to it. In order to have it render properly, I used the shell modifier. That way, it wouldn’t be see through.
This marks the end of the steps for the creation the the platform assets.
UVs:
Land
This wireframe was created in 3DS max using the Unwrap UVW. This was done to later (if possible) add any additional details for any platforms shown in the “Earthina into the Jungle” asset section.
Grass
This wireframe was created in 3DS max using the Unwrap UVW. This was done to later (if possible) add any additional details for any platforms shown in the “Earthina into the Jungle” asset section. There are some errors, like the wires touching each other.
Errors:
This is unfortunately what happens when I cloned the platforms and stretch then to a different size. Errors include:
-Stretched squares
-Distorted squares
-Uneven squares
I hope to fix this in the future.
 Status: “In-development”
Process: For steps in the creation of Platform Assests 1-3, please check the steps below.
Questions for reviewer: How can I improve the platform?
Artist: Timothy Lai
Media: 3D Modeling (3DS Max)
Use: Used as platforms for “Earthina into the Jungle” game.
*To exit enlarged image mode, press the back button in your web browser.
Land:
Step 1
Step 1: I created a box for the “grass” and “land”
Step 2: I used the MeshSmooth to smoothen the edges
Step 3: I used the edit poly to make more natural curves
Step 2
In this step, I used the vertex tool (highlighted in yellow) to move the point forward in order to make bumps (as shown better in the platform above.
Step 3
In this step, I used the edge tool (highlighted in yellow) to move the line (highlighted in red) to either raise, move the line sideways, and create more lines by cloning it.
This marks the end of the land platform (the picture shown above) steps.
Grass:
This step was done in the same manner as the “Land” platform. However, there are some differences.
Step 1: The noise modifier was used to make the “grass platform” have more wild edges.
Step 2: Unlike the previous steps, the “grass platform” was created by cutting the top portion of the platform next to it. In order to have it render properly, I used the shell modifier. That way, it wouldn’t be see through.
This marks the end of the steps for the creation the the platform assets.
UVs:
Land
This wireframe was created in 3DS max using the Unwrap UVW. This was done to later (if possible) add any additional details for any platforms shown in the “Earthina into the Jungle” asset section.
Grass
This wireframe was created in 3DS max using the Unwrap UVW. This was done to later (if possible) add any additional details for any platforms shown in the “Earthina into the Jungle” asset section. There are some errors, like the wires touching each other.
Errors:
This is unfortunately what happens when I cloned the platforms and stretch then to a different size. Errors include:
-Stretched squares
-Distorted squares
-Uneven squares
I hope to fix this in the future.


